I've added a new page to the blog, accessible via a new tab at the top of the page.
The Post Listing page will make it easier to locate resources.
Tuesday, September 27, 2011
Tripods
I promised in my very first real post that I would go more into depth about tripods. There are, of course, a variety of different tripods, depending on application and budget.
As I tried to establish in that first post, wether you have a cheap Walmart tripod or something more substantial, at least having something is a good start.
I'm going to detail exactly what you may want to invest in depending on what kind of thing you want to shoot and what kind of equipment you have.
Cheapie-Charley
 |
| Image Courtesy Bower |
We've all seen (and likely had the misfortune of using) the cheap aluminum and plastic tripods pedaled at the big-box stores. I will say again that something is better than nothing. If this is what you have, keep using it. However, these tripods present problems like stability and overall quality issues, not to mention a very low weight limit and very unsteady panning. Granted, a nice smooth pan isn't essential for photography, but it is both nice and helpful.
Bottom line, these types of tripod are okay for small point-and-shoot cameras and, once again, are definitely better than nothing
Legs
Once you decide to go with a professional tripod, there are two main components to any tripod: the head and the legs (or 'sticks'). We'll detail the legs first as there are many more head variants.
The most important thing for legs to be is stable. They should isolate the camera from movement and vibration while at the same time being versatile: easily adjusting to uneven terrain or other obstacles. Photographic purists will tell you that wooden legs are the only way to go, as they best isolate the camera from vibration. For those of us who do not wish to break our backs hauling wood around, aluminum or carbon fiber are generally accepted as standard.
There are several considerations to make before choosing a set of legs.
- Do you want to travel with it? If so, think about getting a "travel tripod." These tripods generally have more leg sections which saves room but takes a bit longer to set up.
- Do you want to put a big lens on it? If you do, make sure it is rated to hold at least the weight of the tripod head, your lens, camera, and any other accessories. I would, of course, suggest going above that total weight as other stresses (such as you leaning on it) could cause problems.
- How tall will you want it? Leaning down is fine but if you're 6'4" and your tripod is 5', you will likely become uncomfortable very quickly. Making a tripod shorter is easier than making it taller. Also, try not to rely on the tripod's center column as this will make the tripod less stable.
Ball Head
One of the most popular types of heads among photographers is the ball head. It allows one to pan or tilt in any direction with a varying amount of resistance. These are great for being able to follow a subject, even fast moving subjects. These heads are basically all-purpose workhorses and are very highly recommended.
 |
|
Courtesy Vitec Group
|
Pistol Grip Head
Pistol grip heads are essentially a slight variation to the ball head. These heads (also called "joystick" heads) move freely when squeezed but lock when let go. These are great for things like portraiture, scenery, and object photography. However, they will prove more cumbersome than useful for things like sports and wildlife, especially if you are using a zoom and/or manual focus lens.
 |
| Wimberley Head II Courtesy Wimberley, Inc |
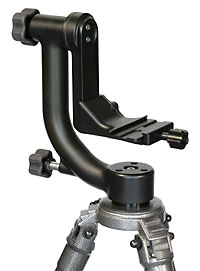
Gimbal Head
Gimbal heads are designed for using long lenses for things like wildlife and action. Long lenses have feet and they are placed on lenses in such a way that, when mounted to a camera, it is close to balanced. A gimbal head relies on this to make using a long lens a easy experience.
 |
| Gitzo Series 3 Courtesy Vitec Group |
Panoramic Head
Panoramic heads are, obviously, for panoramic photography. This is a pan-only head with a precise gauge for panoramic stitching. This is a very specialized head with limited usage.
 |
| Manfrotto 229 Courtesy Vitec Group |
Three-Way Head
The three-way head (also known as a "pan & tilt" head) is basically a higher quality version of the head on the cheap tripods. That being said, these heads are great for portraits and group shots, among other things, of course. It allows the photographer to lock the camera firmly at any angle of pan, tilt, and spin.
 |
| Arca-Swiss C1 Courtesy B&H Photo/Video |
Geared Head
The last head type we'll look at is called a geared head. These heads are highly precise and are created for use in techniques such as macro photography and stop-motion animation. Each adjustment is marked in small measurements and can be easily adjusted in very small increments.
 |
| Arca-Swiss plates from Really Right Stuff |
Quick Release Plates
Most tripod head manufacturers offer at least one style of quick release plate. However, you should know that the "Arca-Swiss Style" plate is generally considered industry standard. In fact, B&H groups its quick release plates into "Arca-Type" and "Proprietary" Also, you'll notice that three of the heads on this page take these plates. The good news is, they are available from a variety of companies. You can get generic plates or plates created for specific cameras and lenses. Further, you can get adapters for tripods not compatible with this system. This way, you can have a quick release plate for every tripod-mountable piece of equipment.
Perhaps I'll go into quick releases in a later post.
Perhaps I'll go into quick releases in a later post.
Monday, September 26, 2011
Film Photography
 |
The first known photographic portrait.
Photographer Robert Cornelius, Nov. 1839.
Public Domain
|
When photography was in its infancy, a bitumen of judea-covered piece of metal was the medium of choice. Eventually, this evolved into a silver halide-covered piece of plastic film.
Film has been used more than any other photographic medium in history. Assuming there are no unexpected revolutions in photographic technology, digital will, of course, eventually eclipse that...in a hundred years or so.
However, film still has its uses—even for professional photographers. I'm going to detail a few of these uses. Perhaps you may find one or more of these interesting.
Hobby/Experimental
A great use for film is hobby photography. Though I'm calling this "hobby," that certainly doesn't exclude professionals. Wether you're wanting to learn photographic lessons with some vintage equipment, or turn out unique photos that digital simply cannot duplicate, film photography is a great way to both play around and learn (but then I repeat myself).
Large Format
You've seen the old-fashioned "bellows cameras" of yesteryear. What you may not have known is many professionals still use this technology due to the stunningly high quality results that can be obtained with these cameras.
Large format photography is largely used by specialized professionals but used equipment is available at a price range well within reach of those hobbyists that want it.
This format is often used for things like landscape photography because it can be blown up to a massive size.
"Large format" is generally any format which is too large to come in rolls. The most common large format size is 4x3 inches but comes in other sizes also including 8x10 and even larger.
The largest cost associated with this type of photography is developing, so I would really suggest investing in the needed darkroom equipment instead of paying someone else to do it.
 |
Widelux F7 35mm Panoramic Camera
© Nic Neufeld/Photo Basics
|
Panoramic Photography
Panoramic photography is technically a large format but deserves its own description.
While there are many people who create panoramas by "stitching" a series of photos together with software, a film panorama creates a single, seamless image on one strip of film.
However, these cameras are expensive.
I recently found a Widelux F7 at an estate sale. I knew it was worth quite a bit more they were selling it for but I had no idea how much. This camera was worth a whopping $700+.
And this is a camera that takes 35mm film.
Other cameras meant to take medium format roll film cost even more. I've seen large format panoramic cameras that were popular in the mid 20th century but haven't been able to find any information about them online to point you to. Sorry. I can tell you, however, that they functioned by passing the film in front of a slit as the camera swung from one side to the other. The exposure was adjusted by changing the speed of the camera's movement. Of course, motion blur is often a problem with this system.
Cinema
Finally, while there have been several digital cinema cameras released to the market such as the Red One, and the Arriflex Alexa, almost all major Hollywood productions as well as prime time television shows are still shot on film. Why? Because film reproduces images with better color, contrast, and "resolution (film, of course, doesn't have 'resolution')" than digital. It will remain this way for a very long time because even if digital meets or surpasses 35mm film, you can make a film frame bigger much more easily than creating a larger digital frame.
There are countless other ways that film and related technologies are still in use. It's (in my opinion) the best way for a new photographer to learn the basics. You don't have to get a bunch of expensive equipment and film. The cheap stuff works just as well. After all, the first camera was just a glorified box.
Also, Walmart in the US offers cheap photo processing so unless you decide to really get into film photography, you don't have to accumulate all that stuff either.
Sunday, September 25, 2011
Drawing with Light
If you break the word "photography" down into its basic parts, it pretty much defines itself. Photography literally means "drawing with light."
I have created another bad animation to attempt to illiterate the most basic concept of photography.
© Nic Neufeld/Photo Basics
What is happening in this animation is relatively simple. Photons (light) are emitted from a light source. In this case, it happens to be the sun but it isn't always.
After leaving the source, the photons then strike surfaces. "Dark" surfaces absorb more photons than "light" surfaces. The light surfaces reflect light and it then makes its way to our eyes (or our camera).
Strangely, photons act both like particles and like waves. That means photons with different wavelengths are interpreted by our eyes to be different colors. So, when photons are reflected from a blue surface, we see them as blue. I'm not a scientist so I don't think I'm explaining this as well as I otherwise could...but as long as you get the basic idea.
If you'd like to know more, forget what your teachers told you, Wikipedia is always a good resource.
Tuesday, September 20, 2011
Quote of the Day
"Composition is the elimination of all unnecessary elements."
-Paul Comon in Digital Photo Design: How to Compose Winning Pictures.
Monday, September 19, 2011
Gear Review: Black Rapid RS-4
 |
| Image courtesy of BlackRapid |
The best thing about this strap is how it connects to the camera: via the camera's 1/4"-20 tripod nut. This is good for two reasons:
One, it holds the camera upside down which puts your camera in a good position to grab, no matter which side you carry your camera on.
Two, if you have a longer lens with a tripod foot attached to your camera (such as the Nikkor 70-200mm), you can attach the strap to the lens rather than the body of the camera, thus relieving stress on the camera body and also properly balancing your camera/lens.
Another interesting feature is the metal fastener actually slides up and down the strap. The strap actually stays in place. It's also easily adjustable and features a small zippered compartment in the shoulder pad for things like memory cards.
BlackRapid suggests that retailers sell the RS-4 for $53.95. B&H follows this suggestion.
Sunday, September 18, 2011
Gear Review Teaser
I never really expect this blog to become a long list of reviews...and who wants that?
However, I have finally purchased an AF-S Nikkor 70-200mm f/2.8G ED VR-II. When it gets here (it can't be soon enough), I'll put it through its paces and post the results here.
I am really looking forward to this lens and it has a lot of expectations to live up to.
However, I have finally purchased an AF-S Nikkor 70-200mm f/2.8G ED VR-II. When it gets here (it can't be soon enough), I'll put it through its paces and post the results here.
I am really looking forward to this lens and it has a lot of expectations to live up to.
Monday, March 14, 2011
Sunday, March 13, 2011
Shutter
Like the aperture, the shutter is a method of exposure control. However, unlike the aperture, which controls the amount of light that strikes the sensor within a given period of time, the shutter is what determines what that period of time is.
There are actually several different types of shutter. These types include the focal plane shutter (also known as a curtain shutter; the type found in SLR and other cameras), the leaf shutter and the diaphragm shutter. Do know that most of these principals are universal regardless of your camera because they all accomplish the same thing with different methods.
Shutter Speed
Shutter speed is usually expressed in a fraction. A shutter speed of 1/30 means the sensor is exposed to light for one thirtieth of a second. However a shutter speed of 30/1 means the sensor is exposed for thirty seconds.
However, on most digital cameras, any shutter speed above one second will be expressed as a whole number. (i.e. instead of 1/30 it will simply be 30). Shutter speeds of one second or lower are expressed with a whole number and a " after the number. A shutter speed of one second looks like 1".
Focal Plane/Curtain Shutter
The focal plane shutter is called that simply because it is very close to the focal plane. It's also known at a curtain shutter which as also a very descriptive name as it's made up of two curtains.
Let's take a look at a crappy animation of my own making to understand how a curtain shutter works.
What you may not know is that SLR cameras actually have two shutter curtains. As you can (hopefully) see, the first curtain opens, exposing the sensor (or film). Then, the second curtain closes. In this way, the whole frame is exposed evenly. If there was only one curtain, going up then down, the top of the frame would be too dark and the bottom would be too bright. This animation shows what the shutter would look like in slow motion at a very slow shutter speed. At higher shutter speeds (usually greater than 1/60), the two curtains will actually be in motion at the same time, one right after the other. At speeds like 1/4000, there will only be a slit between the two curtains. This, of course, presents a problem for flash photography which is why your flash won't fire above a certain shutter speed but I'll get to that on another article.
Central Shutter
The central shutter is the main alternative to the focal plane shutter. The shutter, in this configuration, is almost always located in the lens rather than the camera body. This type of shutter is very popular in medium and large format cameras like Mamiya studio cameras, and Cambo large format camera lenses.
This type of shutter was also commonly used in cameras without removable lenses like twin lens reflex (TLR) cameras and rangefinder cameras.
Many low-end point-and-shoot type cameras also employ a central shutter in the form of a simple (and cheap to manufacture) leaf shutter.
Effects of Shutter Speed
The faster your shutter speed, the easier it is to "freeze" motion. In this photo, you can see an example of the shutter speed being too slow. While it's not imperative to eliminate all motion blur completely, this photo has too much because at first glance, it's a bit difficult to tell just what's going on.
I'll go into detail about good use of motion blur in a later post but a general rule is that motion blur should be merely used to "introduce the idea of motion." In this photo, however, the player's foot looks like it's made of rubber and the football is hardly visible.
There are other issues with the photo too, of course, but the blur is the big problem.
Let's look at one more example in which motion blur is used constructively.
In this photo of the Criminal Justice Center in downtown Fort Worth, Texas, a long shutter speed produces a very blurred vehicle driving down the street. Because the vehicle is not the center of attention, it doesn't matter and actually adds the idea of motion. The building, which is the subject is in nice sharp focus.
This ties in nicely with the other problem of slow shutter speed: shake. If you are hand-holding your camera, you may introduce blur that way as well. This problem only gets worse at longer focal lengths.
To simulate this, hold a pen at one end in your hand. If your hand shakes, the deflection of the end of the pen is only a few millimeters. However, if you hold a long stick in your hand, if your hand shakes, it produces a deflection of (perhaps) several inches. In the event that it doesn't, perhaps you should be a surgeon.
In other words: use a tripod.
There are actually several different types of shutter. These types include the focal plane shutter (also known as a curtain shutter; the type found in SLR and other cameras), the leaf shutter and the diaphragm shutter. Do know that most of these principals are universal regardless of your camera because they all accomplish the same thing with different methods.
Shutter Speed
Shutter speed is usually expressed in a fraction. A shutter speed of 1/30 means the sensor is exposed to light for one thirtieth of a second. However a shutter speed of 30/1 means the sensor is exposed for thirty seconds.
However, on most digital cameras, any shutter speed above one second will be expressed as a whole number. (i.e. instead of 1/30 it will simply be 30). Shutter speeds of one second or lower are expressed with a whole number and a " after the number. A shutter speed of one second looks like 1".
Focal Plane/Curtain Shutter
The focal plane shutter is called that simply because it is very close to the focal plane. It's also known at a curtain shutter which as also a very descriptive name as it's made up of two curtains.
 |
| © Nic Neufeld/Photo Basics |
What you may not know is that SLR cameras actually have two shutter curtains. As you can (hopefully) see, the first curtain opens, exposing the sensor (or film). Then, the second curtain closes. In this way, the whole frame is exposed evenly. If there was only one curtain, going up then down, the top of the frame would be too dark and the bottom would be too bright. This animation shows what the shutter would look like in slow motion at a very slow shutter speed. At higher shutter speeds (usually greater than 1/60), the two curtains will actually be in motion at the same time, one right after the other. At speeds like 1/4000, there will only be a slit between the two curtains. This, of course, presents a problem for flash photography which is why your flash won't fire above a certain shutter speed but I'll get to that on another article.
Central Shutter
The central shutter is the main alternative to the focal plane shutter. The shutter, in this configuration, is almost always located in the lens rather than the camera body. This type of shutter is very popular in medium and large format cameras like Mamiya studio cameras, and Cambo large format camera lenses.
This type of shutter was also commonly used in cameras without removable lenses like twin lens reflex (TLR) cameras and rangefinder cameras.
Many low-end point-and-shoot type cameras also employ a central shutter in the form of a simple (and cheap to manufacture) leaf shutter.
Effects of Shutter Speed
 |
| © Nic Neufeld/Photo Basics |
I'll go into detail about good use of motion blur in a later post but a general rule is that motion blur should be merely used to "introduce the idea of motion." In this photo, however, the player's foot looks like it's made of rubber and the football is hardly visible.
 |
| © Nic Neufeld/Photo Basics |
Let's look at one more example in which motion blur is used constructively.
In this photo of the Criminal Justice Center in downtown Fort Worth, Texas, a long shutter speed produces a very blurred vehicle driving down the street. Because the vehicle is not the center of attention, it doesn't matter and actually adds the idea of motion. The building, which is the subject is in nice sharp focus.
This ties in nicely with the other problem of slow shutter speed: shake. If you are hand-holding your camera, you may introduce blur that way as well. This problem only gets worse at longer focal lengths.
To simulate this, hold a pen at one end in your hand. If your hand shakes, the deflection of the end of the pen is only a few millimeters. However, if you hold a long stick in your hand, if your hand shakes, it produces a deflection of (perhaps) several inches. In the event that it doesn't, perhaps you should be a surgeon.
In other words: use a tripod.
Tuesday, March 1, 2011
Aperture
One of the most difficult things to understand about photography is the aperture. The aperture may also be referred to as the iris or the diaphragm.
Simply, a photographic aperture is the means of controlling the amount of light that strikes the sensor (or film). Aperture is basically a fancy word for a hole.
Exposure Control
The main use of the aperture is to control exposure. As you probably know, the smaller your aperture is set, the less light it will allow through. However, a smaller aperture is represented by a larger "f-number." I'll go into more detail on "f-numbers" or "f-stops" later. For now, just know that an aperture of f/1.4 is much larger than an aperture of f/22.
In early box cameras, such as the Kodak Brownie, a photographer had the ability to choose between two apertures: one for daylight (a small aperture) and one for darker subjects (a larger aperture). One would literally push or pull a small metal tab on the camera body to move the correct hole into place behind the lens.
Today, the aperture is much more advanced but still operates on the same principal.
The lenses on modern SLR cameras have what's called an iris diaphragm. The iris diaphragm is a mechanical means of creating an aperture. Because photographers face widely varying lighting conditions, from very bright to very dim, a mechanical iris diaphragm is an efficient method to change the aperture.
The iris diaphragm uses "blades" to create an opening that can be made larger and smaller.
Depth Of Field
Another effect that the adjustment of the aperture has on the final image is the depth of field. I'll go more into depth on DoF in another article but here's the gist.
Below is a little mock-up of a simple studio setup. The camera is in the center, our subject stands right in front of it. The field of view (what the camera can see) is represented by the red lines.
In the first image, the green lines represent our field. The field is the area in front of the camera that is in focus. So, the depth of field is the depth of the area that is in focus. In this diagram, the depth of field is large. The subject could move forward or backward and still remain in focus.
To achieve this, the aperture is set to a high aperture value (small aperture size).
 |
| © Nic Neufeld/Photo Basics |
In the next diagram, we see a shallow depth of field. If the subject were to move forward or backward, he would be out of focus.
 |
| © Nic Neufeld/Photo Basics |
The depth of field also varies depending on focal length. Further, the aperture has a direct affect on the appearance of the bokeh. I'll get to both of these at a later time.
Subscribe to:
Posts (Atom)